A Custom List Item Layout
Recently I implemented my first custom Android layout, and I thought it
might be an interesting experience to share. In short, it was a lot less work
than I expected and it taught me useful things about ViewGroup, the
heart of Android's widget framework.
Curious Optimizations
I remember reading Android Layout Tricks #1 on the developer's blog a couple of years ago and thinking "hey, that's premature optimization if I ever saw it".
Much has changed since 2009. Hardware acceleration is standard now, and the Android team has put lots of effort into enabling smooth, 60 fps drawing. Is there still a market for layout tricks? Yes! Creating working, fast, maintainable layouts is an art. Learning more about the classes that make up the view framework is a great way to practice this art.
This will take a few paragraphs to explain though, even if we make it a TV chef-style introduction with lots of cut corners. So snuggle down in your chair and get ready.
We're going to build a somewhat generic ListItemLayout that meets the
following requirements.

- It has an image on the left
- Several rows of text on the right
- Automatic height
- Both columns centered vertically if there is extra space
- Supports scalable font sizes (sp)
- No crazy XML tricks required
The straight forward solution would be to use two nested LinearLayouts. But in the spirit of the "layout tricks" post, we will do it with a custom layout so there is no nesting. By the way, if you think you can do this with a single RelativeLayout, try it out. It's harder than it looks.
Here's an example of the kind of XML we aim for.
<com.custom.ListItemLayout
    android:id="@+id/custom"
    android:layout_height="wrap_content"
    android:layout_width="match_parent"
    android:padding="8dp" >

    <ImageView
        android:id="@+id/image"
        android:layout_width="wrap_content"
        android:layout_height="wrap_content"
        android:layout_marginRight="8dp"
        android:src="@drawable/ic_menu_star" />

    <TextView
        android:id="@+id/text1"
        android:layout_height="wrap_content"
        android:layout_width="wrap_content"
        android:text="Primary text" />

    <TextView
        android:id="@+id/text2"
        android:layout_height="wrap_content"
        android:layout_width="wrap_content"
        android:text="Details" />

</com.custom.ListItemLayout>
ViewGroup
ViewGroup is a magic class that enables nesting of Views. It has the same responsibilities as any other view, but in addition it has a bunch of child views to manage.
A custom layout is just a subclass of ViewGroup.
public class ListItemLayout extends ViewGroup {

    public ListItemLayout(Context context) {
        this(context, null);
    }

    public ListItemLayout(Context context, AttributeSet attrs) {
        super(context, attrs);
    }

    ...
The first constructor is for creating a view from Java. The second one makes the view inflatable from XML. There is a third version (not shown here) that provides style extension and can be skipped.
Layout Params
Child views give their parent hints about their desired position via layout
parameters. By convention these have XML-names prefixed with layout_ and
should be very familiar.
<FrameLayout ... >
    <ImageView
        android:layout_width="wrap_content"
        android:layout_height="wrap_content"
        android:layout_gravity="center"
        ... />
When the XML parser creates a view, it asks the parent view for a
LayoutParams object and populates it with the layout params. The default
ViewGroup.LayoutParams class supports only two values: height and width.
ViewGroup subclasses are meant to extend it by adding parameters of their
own. FrameLayout.LayoutParams for instance adds just a single one: layout_gravity.
To keep things simple, ListItemLayout does not define a new type of
LayoutParams. Instead it uses the built-in MarginLayoutParams, which
is like the base version but includes support for margins.
There's a cluster of four methods that must be implemented to make this happen.
/**
 * Called when children's XML is parsed.
 */
@Override
public MarginLayoutParams generateLayoutParams(AttributeSet attrs) {
    return new MarginLayoutParams(getContext(), attrs);
}

/**
 * Someone called addView() but forgot to specify layout params.
 */
@Override
protected MarginLayoutParams generateDefaultLayoutParams() {
    return new MarginLayoutParams(MarginLayoutParams.WRAP_CONTENT,
                                    MarginLayoutParams.WRAP_CONTENT);
}

/**
 * These two methods are used to convert layout params of an incorrect
 * type.
 */
protected boolean checkLayoutParams(ViewGroup.LayoutParams p) {
    return p instanceof MarginLayoutParams;
}

@Override
protected MarginLayoutParams generateLayoutParams(
        ViewGroup.LayoutParams p) {
    return new MarginLayoutParams(p);
}
Great, now the margins we specify in XML will be available from the child's getLayoutParams().
We still need a way to decide which child should go on the left. Since
children are parsed and added to a ViewGroup in XML document order, let's use
the convention that the first child is assumed to be the image, while remaining
children are treated as texts. To make our intent clear, we name them "image
view" and "text views" respectively, but they can in fact be any type of
view, including other ViewGroups.
Let's make an iterable for the text views, so we can use the abbreviated
for syntax to loop over them.
private View imageView() {
    // convention, use first child as the image
    return getChildAt(0);
}

private Iterable<View> textViews = new Iterable<View> () {
    // the remaining views are assumed to be text lines
    @Override
    public Iterator<View> iterator() {
        return new Iterator<View>() {
            private int current = 1;

            @Override
            public boolean hasNext() {
                return current < getChildCount();
            }

            @Override
            public View next() {
                if (current >= getChildCount())
                    throw new NoSuchElementException();
                return getChildAt(current++);
            }

            @Override
            public void remove() {
                throw new UnsupportedOperationException();
            }
        };
    }
};
Measure
Layout on Android is a two-step process. First comes the measuring step, where
a view is handed a pair of MeasureSpec's, one for the width and one for the
height, and from them must determine its preferred size. A MeasureSpec
specifies one of three constraints:
- EXACTLY n
- The view must be exactly n pixels.
- AT_MOST n
- The view can be any size up to n pixels.
- UNSPECIFIED
- The view may choose its own size.
A view has complete freedom in how the measurement is done. For instance, in
response to onMeasure(AT_MOST 200, UNSPECIFIED), a TextView may run a
word-wrap algorithm. An ImageView may scale the image while preserving its
aspect ratio, etc.
ViewGroups typically handle onMeasure() by measuring each child view over one
or several passes. A LinearLayout, for instance does a first pass to figure
out how big each child wants to be, and a second pass to distribute or reclaim
any excess space.
The only absolute requirement is that before onMeasure() returns, it must call setMeasuredDimensions() to report its preferred size.
Compared to LinearLayout, our implementation of onMeasure() is simple.
First a couple of utility methods to fetch the measured size of a child,
including margins.
private int widthWithMargins(View child) {
    MarginLayoutParams lp = (MarginLayoutParams)child.getLayoutParams();
    return child.getMeasuredWidth() + lp.leftMargin + lp.rightMargin;
}

private int heightWithMargins(View child) {
    MarginLayoutParams lp = (MarginLayoutParams)child.getLayoutParams();
    return child.getMeasuredHeight() + lp.topMargin + lp.bottomMargin;
}
Now for onMeasure() itself. Start by reserving room for the image. Then
run a single pass over the texts to sum up their total height.
@Override
protected void onMeasure(int widthMeasureSpec, int heightMeasureSpec) {
    int widthUsed = 0;
    int heightUsed = 0;

    View image = imageView();
    // Image goes to the left: measure and reserve horizontal space
    measureChildWithMargins(image, widthMeasureSpec, widthUsed,
            heightMeasureSpec, heightUsed);
    widthUsed += widthWithMargins(image);

    // Use remaining space to stack the text views vertically.
    int textWidth = 0;
    for (View child : textViews) {
        measureChildWithMargins(child, widthMeasureSpec, widthUsed,
                heightMeasureSpec, heightUsed);
        heightUsed += heightWithMargins(child);
        textWidth = Math.max(textWidth, widthWithMargins(child));
    }
    widthUsed += textWidth;

    // handle the case where the image is taller than the texts combined
    heightUsed = Math.max(heightWithMargins(image), heightUsed);

    widthUsed += getPaddingLeft() + getPaddingRight();
    heightUsed += getPaddingTop() + getPaddingBottom();

    setMeasuredDimension(
            resolveSize(widthUsed, widthMeasureSpec),
            resolveSize(heightUsed, heightMeasureSpec));
}
The variables widthUsed and heightUsed contain the accumulated size. The
total width will be the width of the image plus the width of the widest text.
The total height is either the image's height or the combined heigh of all
texts, whichever is larger.
The method measureChildWithMargins() in ViewGroup does the hard work
of reconciling the current MeasureSpecs with the layout_height and
layout_width of the child.
For instance, imagine that the image view claimed 100px of horizontal space,
so widthUsed=100. If one of the text views has a width of wrap_content and
our MeasureSpec says EXACTLY 300px, then measureChildWithMargins calls the
child's onMeasure with a widthMeasureSpec of AT_MOST 200px. There are such
9 combinations in total. Have a look at getChildMeasureSpec() to see
how each one is handled.
resolveSize() is another useful method from View. It either
stretches or clips the measured size to respect the current MeasureSpec. Our
view might look bad if there is not enough space, but at least we won't
violate the constraints set by our parent.
That's it. The measurement stage is complete.
Layout
The second step of the layout process is implementing onLayout(). At this
point, the view can no longer influence its own placement. For a ViewGroup,
what remains is to position the child views.
@Override
protected void onLayout(boolean changed, int l, int t, int r, int b) {
    int x = getPaddingLeft();
    int y = getPaddingTop();

    int innerHeight = getHeight() - getPaddingTop() - getPaddingBottom();

    // center image vertically
    View image = imageView();
    int dy = Math.max(0, (innerHeight - heightWithMargins(image)) / 2);
    placeChild(image, x, y + dy);

    x += widthWithMargins(image);

    // center texts as a group
    int textHeight = 0;
    for (View child : textViews) {
        textHeight += heightWithMargins(child);
    }

    y += Math.max(0, (innerHeight - textHeight) / 2);

    for (View child : textViews) {
        placeChild(child, x, y);
        y += heightWithMargins(child);
    }
}
If onMeasure() did its job properly, each child has called
setMeasuredDimension() to its preferred size. We loop through them and call
layout() on each one. The only difference to onMeasure() is that we know
our final height now, so we take care to vertically center both the image and
the texts.
placeChild is a simple helper that saves some typing.
private void placeChild(View child, int left, int top) {
    MarginLayoutParams lp = (MarginLayoutParams)child.getLayoutParams();
    child.layout(
            left + lp.leftMargin,
            top + lp.topMargin,
            left + lp.leftMargin + child.getMeasuredWidth(),
            top + lp.topMargin + child.getMeasuredHeight());
}
Improvements
The flexibility of this layout would be greatly increased by correctly
handling children with visibility set to GONE. It's not difficult to account
for. Just modify onMeasure and onLayout to treat such children as if they
do not exist. The result is available here.
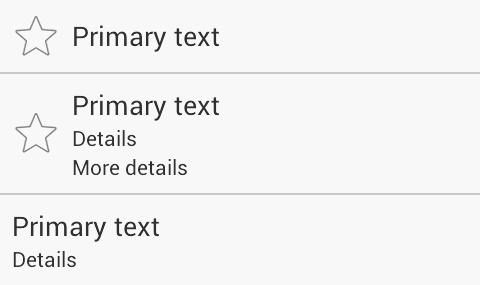
With a fix in place, the texts will automatically stay centered as the visibility changes. Here are some examples of how that might look:
Drawbacks
Writing a custom layout is often unnecessary. A combination of Linear/Frame/RelativeLayouts might get the job done with less effort, perhaps at the cost of some clutter in the view hierarchy.
I recommend trying it anyway, because it opens your eyes to what's possible.
For instance, my main gripe with RelativeLayout is that it tends to act more
like an UnpredictableLayout when you start to stretch it's limits. Then it
is comforting to know that there is a well documented escape hatch.
Besides, there is nothing strange about custom layouts. They are officially encouraged for "unique or otherwise tricky layouts". Sounds like the kind of layout that could make an app fun to use! The next time you need one, the answer could be to write it yourself.